Managing multiple Raspberry Pi devices can become a little bit of a task if done manually. Website gone down? SSH no longer connecting? Has a service stopped? Which is where Nagios comes into play. Nagios is software to monitor devices across a network and can be used to display the results via a webpage; making it easier to see if a device or a service on a device has stopped working.
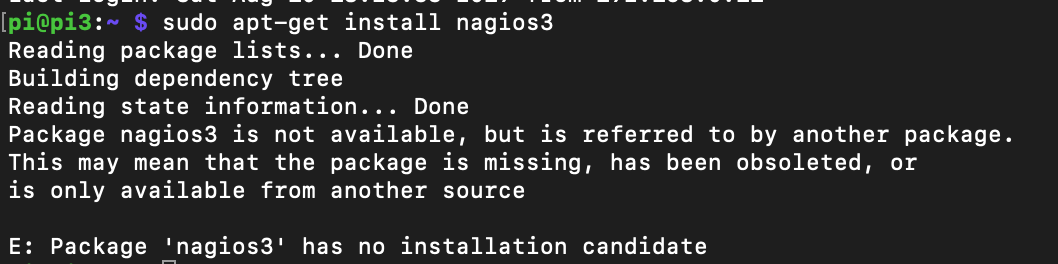
Note: My interest in Nagios was stirred by an article I recently saw but the “sudo apt-get install nagios3” failed so I started to look at alternative ways to install and configure Nagios.
For this blog entry I’m going to be using:
- 1x Raspberry Pi 3 – Running Raspbian Buster (upgraded from Raspbian Stretch)
- 1x Raspberry Pi 4 – Running Raspbian Buster (fresh)
- 2x Raspberry Pi Zero W – Running Raspbian Buster (fresh)
The Pi 3 is going to act as the Nagios server and will check on the status of the other Pi devices.
On the device that will be the Nagios server (for me the Pi 3):
Download and extract Nagios and its pre-reqs
- sudo apt-get update
- sudo apt-get install -y autoconf gcc libc6 make wget unzip apache2 apache2-utils php libgd-dev
- cd /tmp
- a) wget -O nagioscore.tar.gz https://github.com/NagiosEnterprises/nagioscore/archive/nagios-4.4.3.tar.gz OR b) wget -O https://assets.nagios.com/downloads/nagioscore/releases/nagios-4.4.3.tar.gz OR c) download from https://www.nagios.org/downloads/nagios-core/ and copy the tar.gz file to cd/tmp
- a) tar xzf nagioscore.tar.gz b) tar xzf nagios-4.4.3.tar.gz c) tar xzf YOUR_DOWNLOAD_NAME.tar.gz
Create Nagios user and group
- sudo adduser nagios
- sudo groupadd nagcmd
- sudo usermod -a -G nagcmd nagios
- sudo usermod -a -G nagcmd www-data
Compile and Install Nagios
- cd /tmp/nagioscore-nagios-4.4.3/
- ./configure –with-httpd-conf=/etc/apache2/sites-enabled
- make all
- make install
- make install-daemoninit
- make install-commandmode
- make install-config
Configure Apache
- make install-webconf
- a2enmod rewrite
- a2enmod cgi
- htpasswd -c /usr/local/nagios/etc/htpasswd.users nagiosadmin
Start / Restart Services
- service apache2 restart
- service nagios start
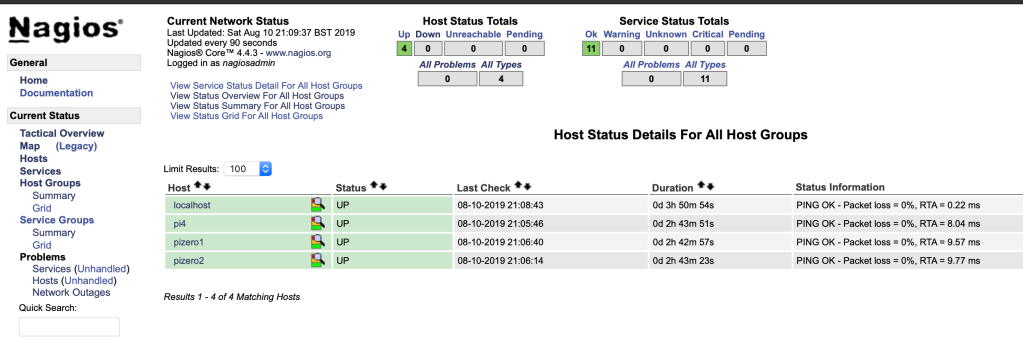
At this point Nagios is installed and should now be running, if you open a web browser on the Pi and navigate to http://pi_ip_address/nagios/ you should be able to see the Nagios page. Remember to change pi_ip_address with your Raspberry Pi’s IP address.
Now for the Nagios plug ins.
Nagios Plug Ins
- apt-get install -y autoconf gcc libc6 libmcrypt-dev make libssl-dev wget bc gawk dc build-essential snmp libnet-snmp-perl gettext
- cd /tmp
- wget –no-check-certificate -O nagios-plugins.tar.gz https://github.com/nagios-plugins/nagios-plugins/archive/release-2.2.1.tar.gz
- tar zxf nagios-plugins.tar.gz
- cd /tmp/nagios-plugins-release-2.2.1/
- ./tools/setup
- ./configure
- make
- make install
Start Nagios At Boot
- sudo systemctl enable nagios
On the devices that are to be monitored (for me this is a Pi 4 and 2 Pi Zero Ws) the Nagios Remote Plugin Executor (NRPE) needs installing so that Nagios can send commands to the devices.
Install and configure NRPE
- sudo apt-get install nagios-nrpe-server nagios-plugins
- sudo nano /etc/nagios/nrpe.cfg and add the IP address of the Nagios server to the section that says “Allowed Hosts”. For me this was adding 192.168.0.28 (the IP of the Pi3).
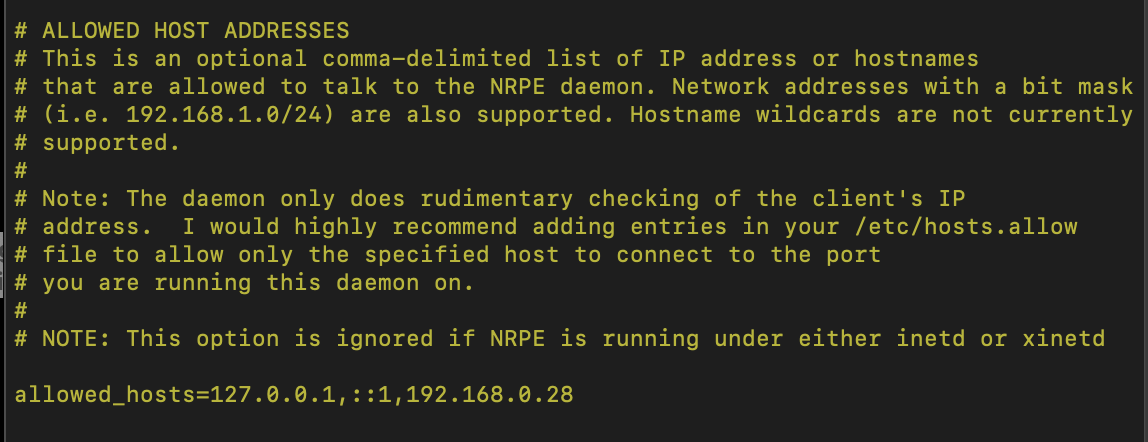
3. sudo nano /etc/hosts.allow and add the IP address of the Nagios server, for me this was adding 192.168.0.28 (the IP of the Pi3).
Now back to the Nagios server (the Pi3 for me) and time to create some configuration files (.cfg) files to let Nagios know about the Pi4 and the two Pi Zero Ws.
Setting Up Config Files
On the Nagios server a hostname.cfg file is needed for each host that Nagios is going to be monitoring (with hostname replaced by the devices name, e.g. pi4.cfg). The .cfg file will contain information about the host and what needs to be monitored.
The definitions / templates for the cfg files can be viewed at https://assets.nagios.com/downloads/nagioscore/docs/nagioscore/3/en/objectdefinitions.html.
Here is an example of the .cfg file I am using, I have put in bold the bits that need to change per host file:
define host {
use linux-server
host_name pi4
alias pi4
address 192.168.0.48
register 1
}
define service{
host_name pi4
service_description PING
check_command check_ping!100.0,20%!500.0,60%
max_check_attempts 2
check_interval 2
retry_interval 2
check_period 24×7
check_freshness 1
contact_groups admins
notification_interval 2
notification_period 24×7
notifications_enabled 1
register 1
}
define service{
host_name pi4
service_description SSH
check_command check_ssh
max_check_attempts 5
check_interval 5
retry_interval 3
check_period 24×7
notification_interval 30
notification_period 24×7
notifications_enabled 1
contact_groups admins
}
define service{
host_name pi4
service_description Local Disk
check_command check_local_disk!20%!10%!/
max_check_attempts 5
check_interval 5
retry_interval 3
check_period 24×7
notification_interval 30
notification_period 24×7
notifications_enabled 1
contact_groups admins
}
define service{
host_name pi4
service_description Users
check_command check_local_users!20!50
max_check_attempts 5
check_interval 5
retry_interval 3
check_period 24×7
notification_interval 30
notification_period 24×7
notifications_enabled 1
contact_groups admins
}

I have created a hostname.cfg for each of the devices I want to monitor (i.e. pi4.cfg, pizero1.cfg, pizero2.cfg).

Then I’ve used sudo nano /usr/local/nagios/nagios.cfg to edit the main nagios.cfg file to add in the hostname.cfg files so that Nagios knows about them.
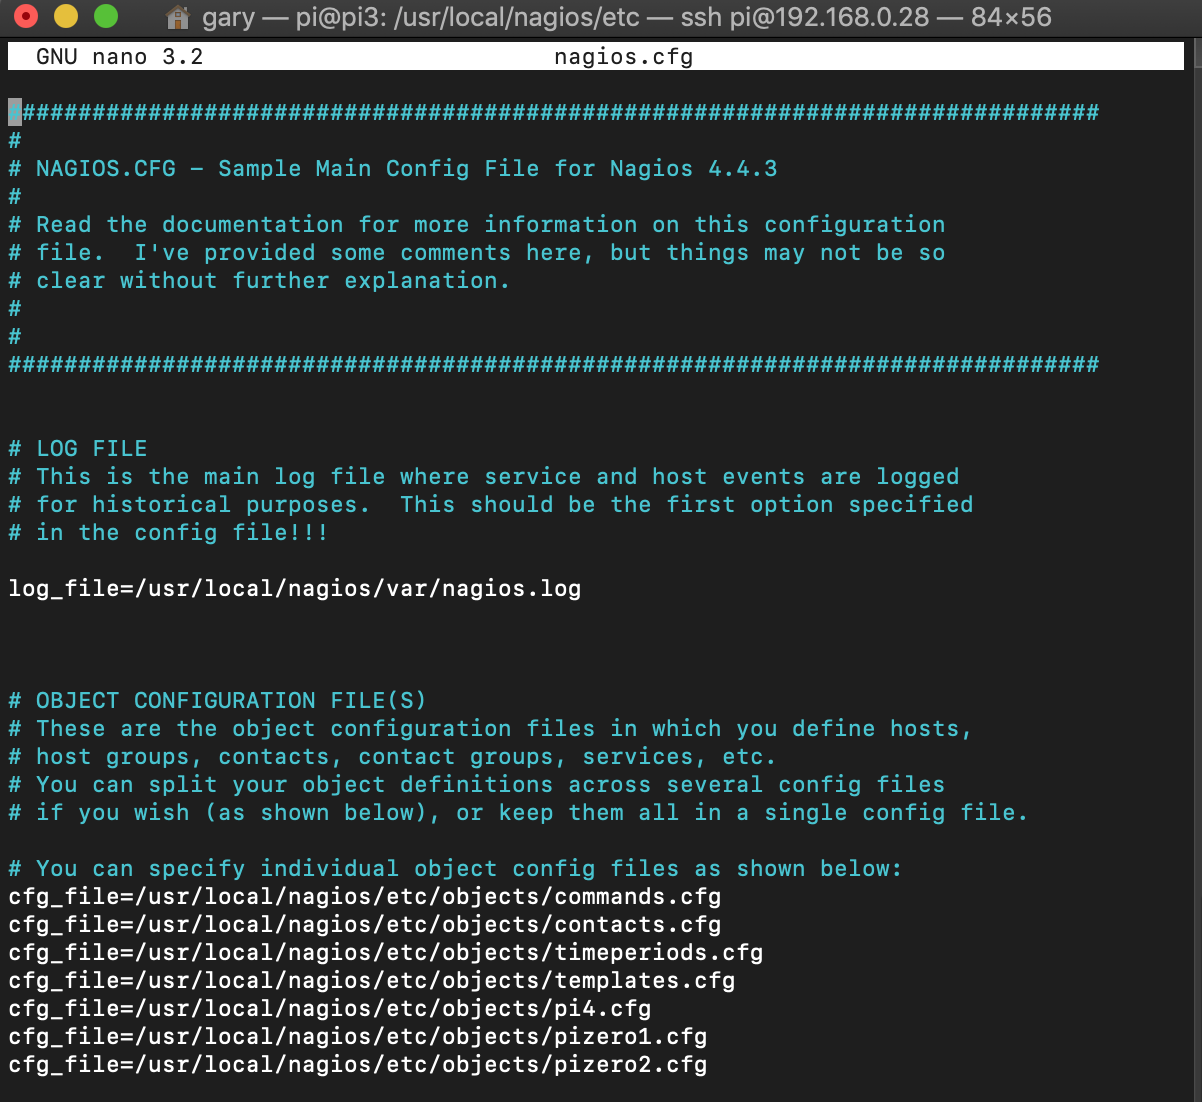
After all of this is saved the Nagios service needs to be restarted:
sudo systemctl restart nagios
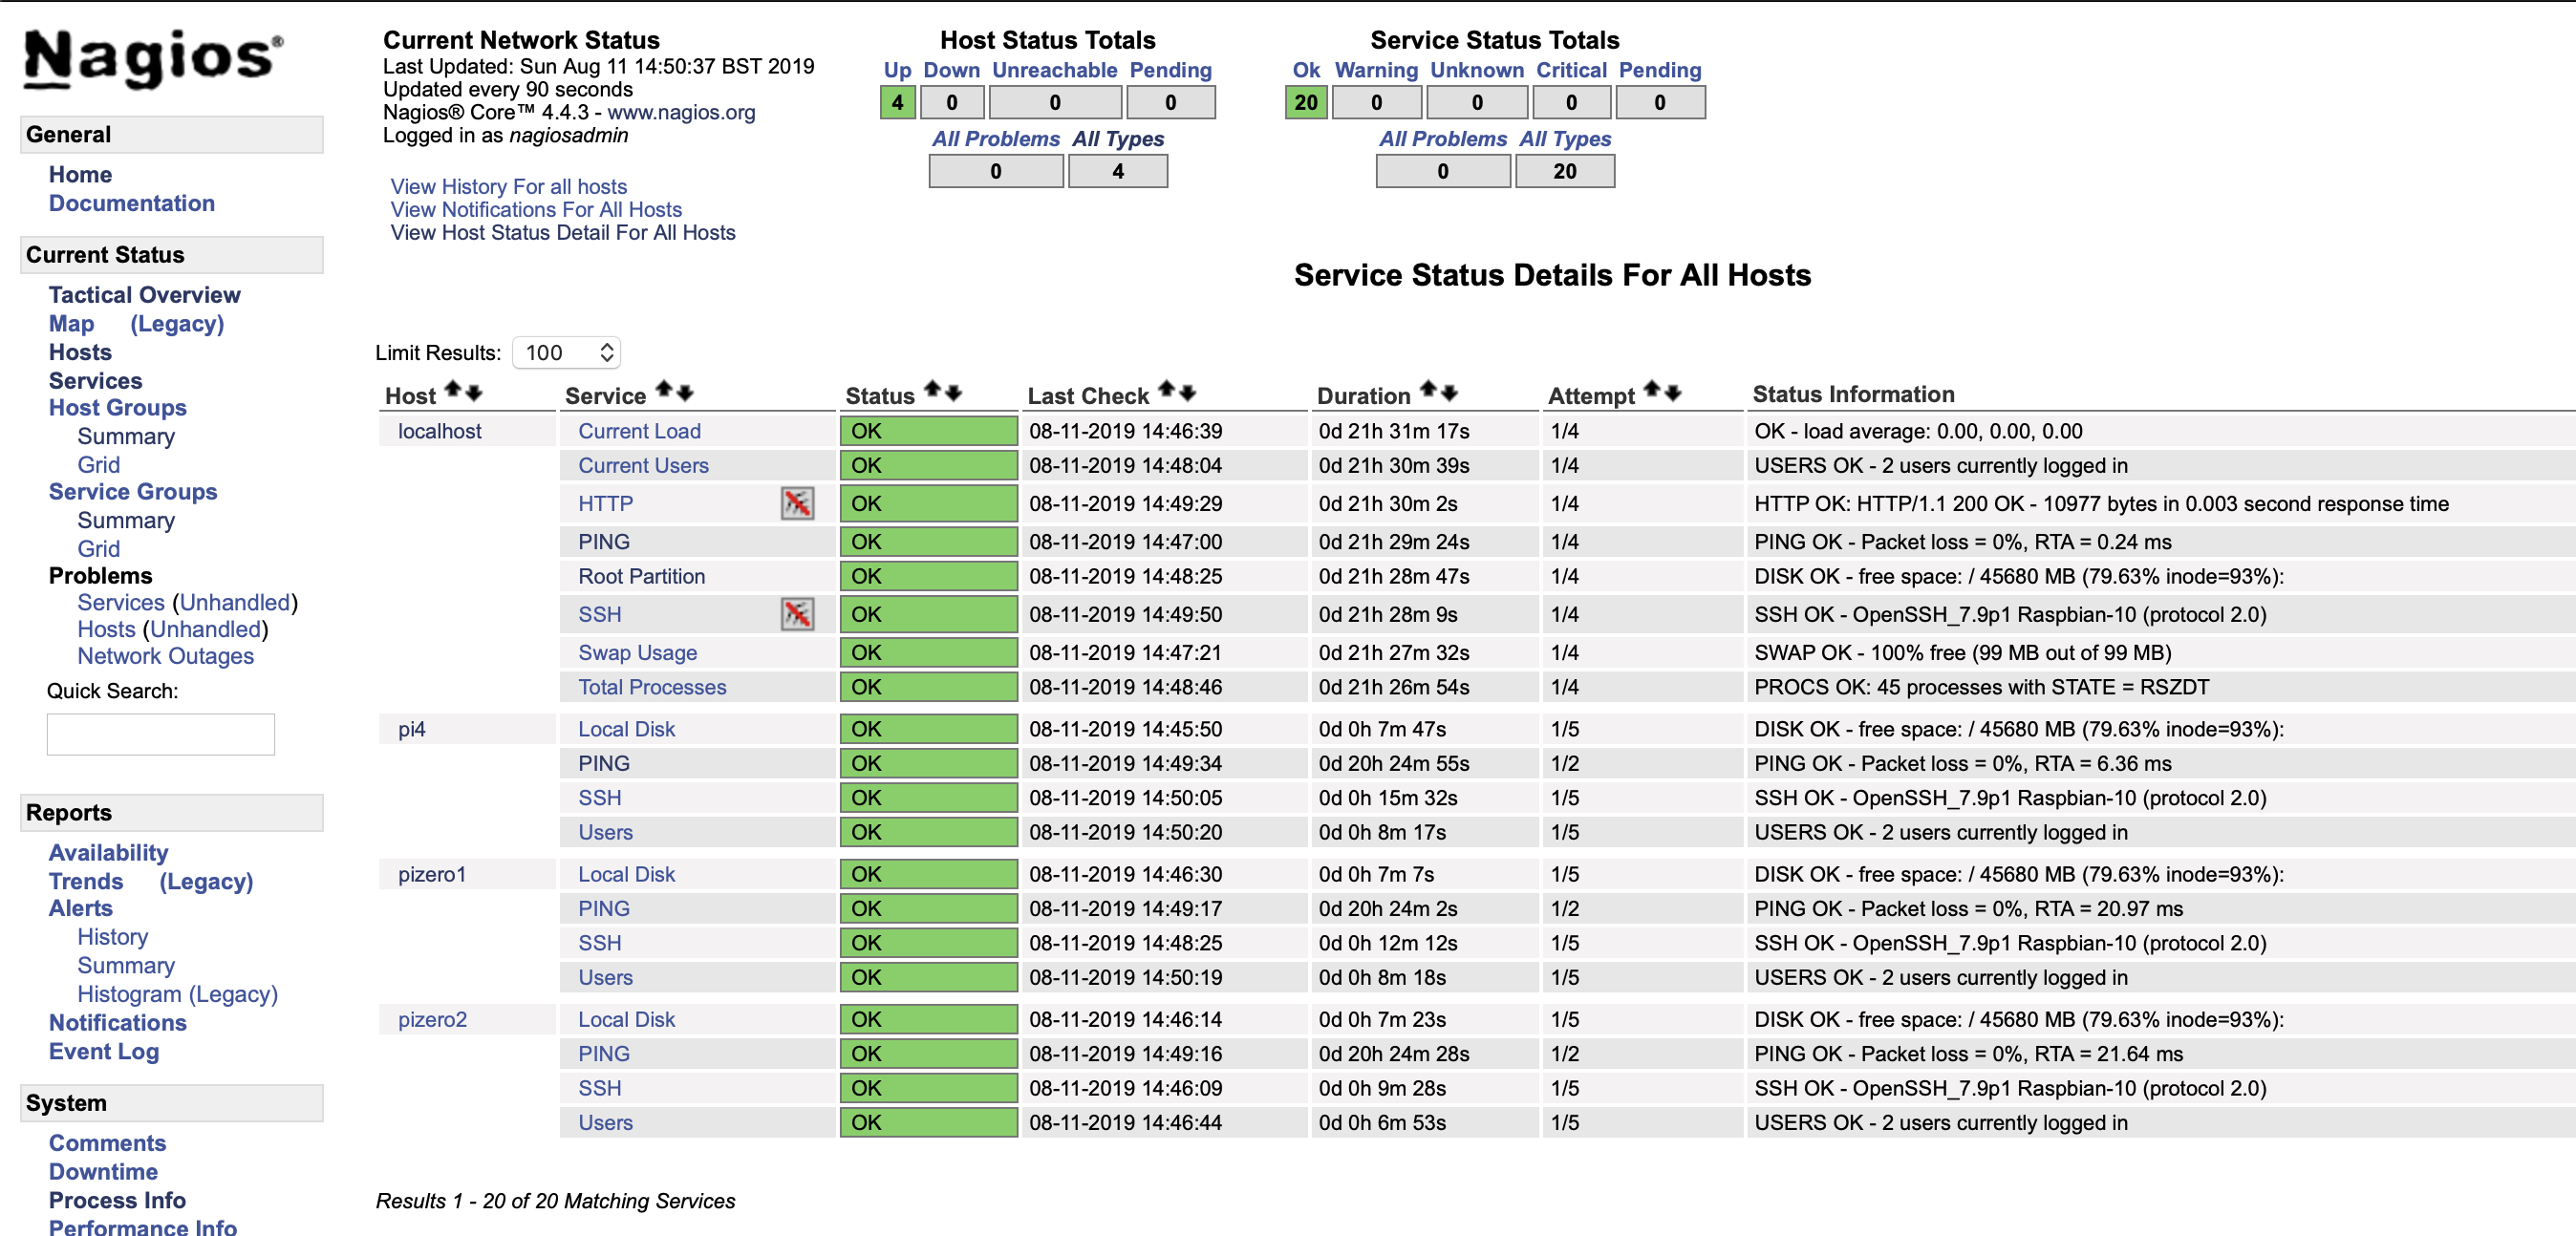
If all goes to plan you should now be able to browse to the Nagios page (http://IP_OF_DEVICE_RUNNING_NAGIOS/Nagios) and after a few minutes see the statuses of your devices.
Troubleshooting
I hit a few speed bumps during this blog entry, hopefully this information may help others.
- Devices Not Reporting Back In
If (like me) you are using a firewall (UFW) check that all the devices have rules that allow them to talk to each other.
- Nagios Service Fails To Start
Nagios preforms a “pre-flight” check when trying to start or restart. If you have just configured the hostname.cfg files or changed a setting in them then this is normally the cause. I’d recommend running journalctl -xe and reading through to see if anything stands out (for me it was a mis-spelt command).
- The Nagios Page Says Whoops
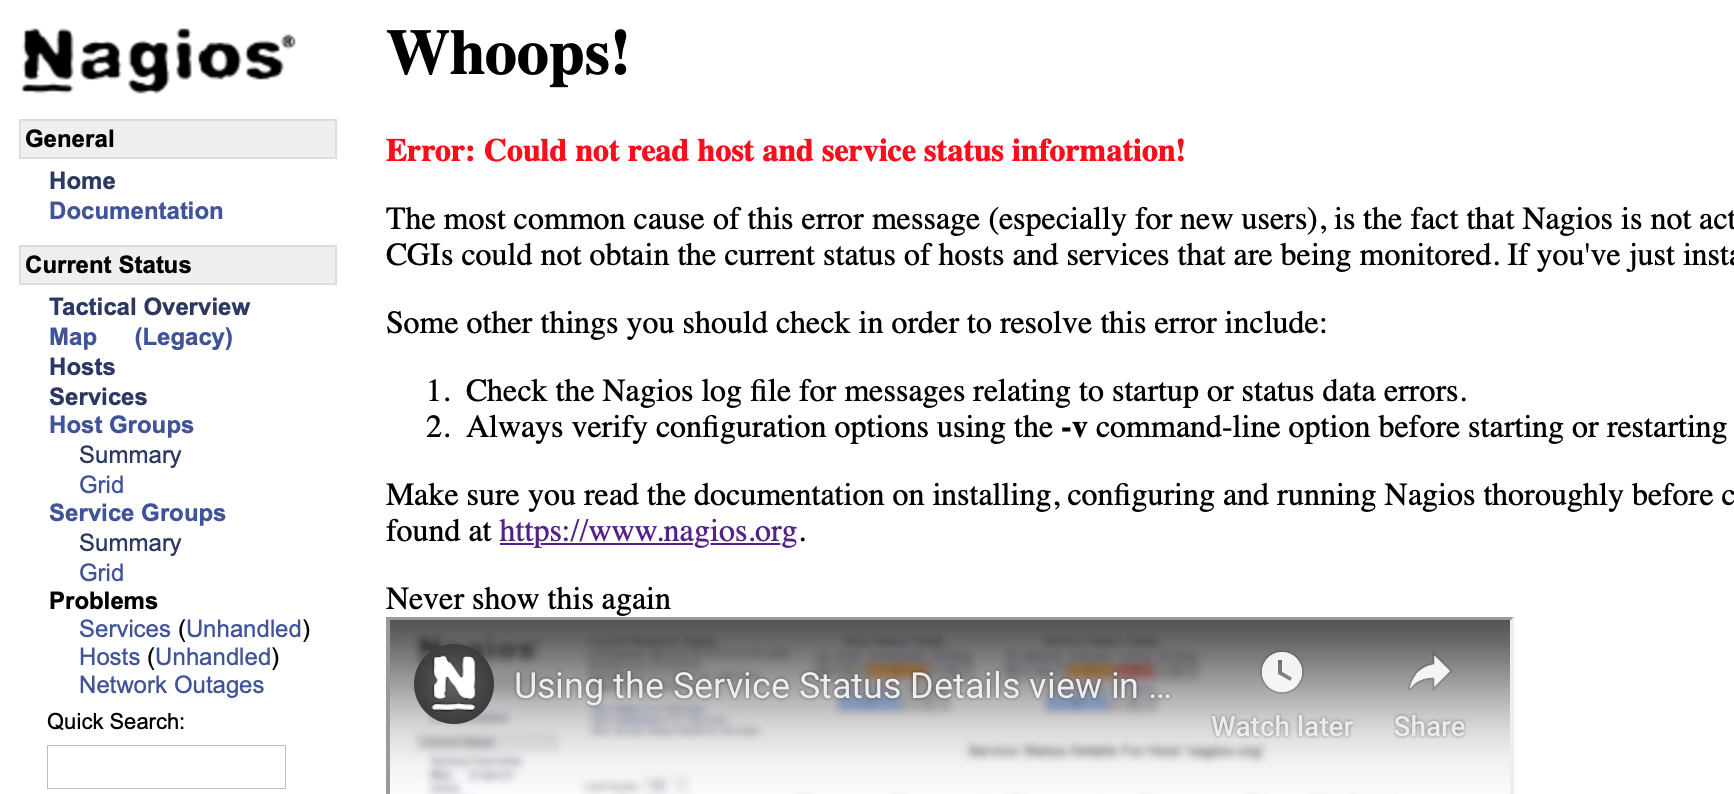
This occurs as the Nagios server cannot get the status of the hosts, for me this was because the service did not restart (see above) after I made some configuration changes. In the first instance I recommend checking that the Nagios service is running correctly on the device acting as the Nagios server.
Further Reading
I relied on https://tecadmin.net/install-nagios-monitoring-server-on-ubuntu/ and https://support.nagios.com/kb/article/nagios-core-installing-nagios-core-from-source-96.html#Raspbian to help with the installation of Nagios.


2 responses to “Monitoring Multiple Pis With Nagios (Raspberry Pi)”
Hi!
Thanks for a great guide. I’m a beginner and the installation worked for me when I added a few more sudo before the commands and changed a – to –. Below is the changes I made to make it work for a newbie like me.
Thank you very much!
Download and extract Nagios and its pre-reqs
1. sudo apt-get update
2. sudo apt-get install -y autoconf gcc libc6 make wget unzip apache2 apache2-utils php libgd-dev
3. cd /tmp
4. a) wget -O nagioscore.tar.gz https://github.com/NagiosEnterprises/nagioscore/archive/nagios-4.4.3.tar.gz OR b) wget -O https://assets.nagios.com/downloads/nagioscore/releases/nagios-4.4.3.tar.gz OR c) download from https://www.nagios.org/downloads/nagios-core/ and copy the tar.gz file to cd/tmp
5. a) tar xzf nagioscore.tar.gz b) tar xzf nagios-4.4.3.tar.gz c) tar xzf YOUR_DOWNLOAD_NAME.tar.gz
Create Nagios user and group
1. sudo adduser nagios
2. sudo groupadd nagcmd
3. sudo usermod -a -G nagcmd nagios
4. sudo usermod -a -G nagcmd www-data
Compile and Install Nagios
1. cd /tmp/nagioscore-nagios-4.4.3/
2. sudo ./configure –with-httpd-conf=/etc/apache2/sites-enabled
3. sudo make all
4. sudo make install
5. sudo make install-daemoninit
6. sudo make install-commandmode
7. sudo make install-config
Configure Apache
1. sudo make install-webconf
2. sudo a2enmod rewrite
3. sudo a2enmod cgi
4. sudo htpasswd -c /usr/local/nagios/etc/htpasswd.users nagiosadmin
Start / Restart Services
1. sudo service apache2 restart
2. sudo service nagios start
At this point Nagios is installed and should now be running, if you open a web browser on the Pi and navigate to http://pi_ip_address/nagios/ you should be able to see the Nagios page. Remember to change pi_ip_address with your Raspberry Pi’s IP address.
Now for the Nagios plug ins.
Nagios Plug Ins
1. sudo apt-get install -y autoconf gcc libc6 libmcrypt-dev make libssl-dev wget bc gawk dc build-essential snmp libnet-snmp-perl gettext
2. cd /tmp
3. wget –no-check-certificate -O nagios-plugins.tar.gz https://github.com/nagios-plugins/nagios-plugins/archive/release-2.2.1.tar.gz
4. tar zxf nagios-plugins.tar.gz
5. cd /tmp/nagios-plugins-release-2.2.1/
6. sudo ./tools/setup
7. sudo ./configure
8. sudo make
9. sudo make install
Start Nagios At Boot
1. sudo systemctl enable nagios
LikeLike
[…] very straight forward and there’s a lot of good links out there for it including this one geektechstuff.com – monitoring-multiple-pis-with-nagios-raspberry-pi from which got me up and running nice and quick. About the only things I did different from it was […]
LikeLike