With the Kuberenetes Persistent Volume (PV) created, it is time to look at the Persistent Volume Claim (PVC). Originally this blog post was going to be part of the PV post but that grew to nearly 1000 words before I got to this subject, so I split it into its own post. If you skipped the PV post and just want to learn about Kuberenetes PVC here are the key facts you need to know before proceeding:
- I’m using Minikube on a MacBook as my Kubernetes environment
- I looked at Kuberenetes Pod manifests here
- The Persistent Volume (PV) is applied via a YAML file
- The Persistent Volume (PV) has specific lines in it’s YAML file that will be used in this blog post
- There are other types of Kubernetes volumes available
With all that out of the way, let’s get going with Kubernetes Persistent Volume Claims (PVC).
Kubernetes Persistent Volume Claims (PVC)
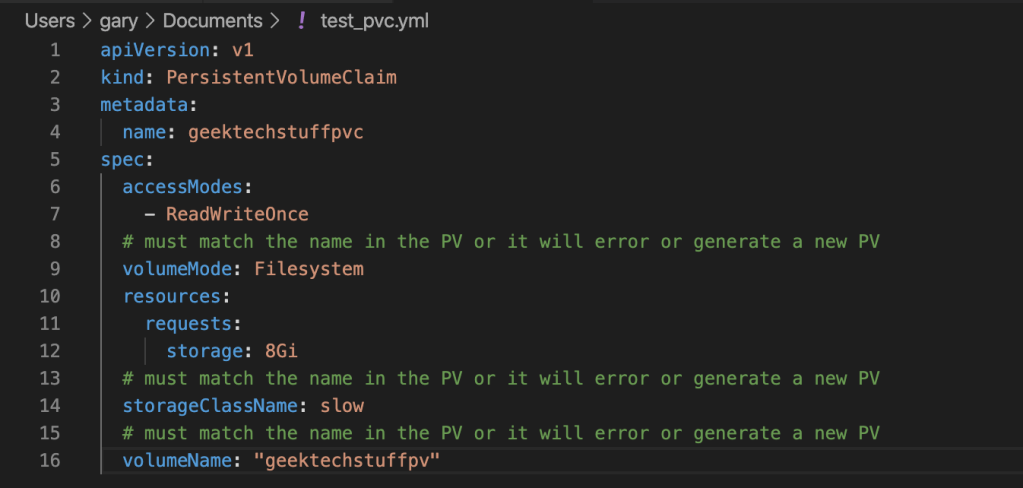
The PVC is a YAML (yml) file that contains references to the Persistent Volume (PV). The PVC acts as the ticket to allow pods access to the Persistent Volume (PV). My PVC looks like this:

—
- The PVC will fail to apply
- The PVC will cause Kubernetes to generate a new PV and apply the PVC to the new PV
With the PVC YAML file created it can be applied using the command:
kubectl apply -f PVCFILE.yml
For me this is:
kubectl apply -f test_pvc.yml

After applying the PVC, it can be checked using the command:
kubectl describe pvc PVCNAME
For me this is:
kubectl describe pvc geektechstuffpvc

If the PVC has failed or applied to a different Persistent Volume then it will show in the describe. If the PVC is failing due to a configuration issue in the YAML file, delete the PVC, edit the configuration and then reapply it.
To delete the PVC use:
kubectl delete pvc PVCNAME
so for my example it is:
kubectl delete pvc geektechstuffpvc
Deleting the Persistent Volume Claim will remove its claim to any Persistent Volume.
A describe on the Persistent Volume should also show that it is now bound to the Persistent Volume Claim (PVC). To check this use:
kubectl describe pv PVNAME
For my example this is:
kubectl describe pv geektechstuffpv

If you prefer using the Kubernetes web interface then you can view the status of the PVC via the “Persistent Volume Claims” link on the left of the dashboard. The status of a successful PVC should be “bound” and it should detail the volume.

Or, use the “Persistent Volumes” link on the left of the dashboard and check that the persistent volume has a claim against it.

In our life-cycle of the Persistent Volume we now have:
- The Persistent Volume (PV) set up
- The Persistent Volume Claim (PVC) set up
Which leaves allocating the PVC to a pod so that the pod can use the PVC to access the PV.


2 responses to “Persistent Volume Claims (Kubernetes)”
[…] Next up the PersistentVolumeClaim (PVC)! […]
LikeLike
[…] Creating a Persistent Volume Claim (PVC) […]
LikeLike