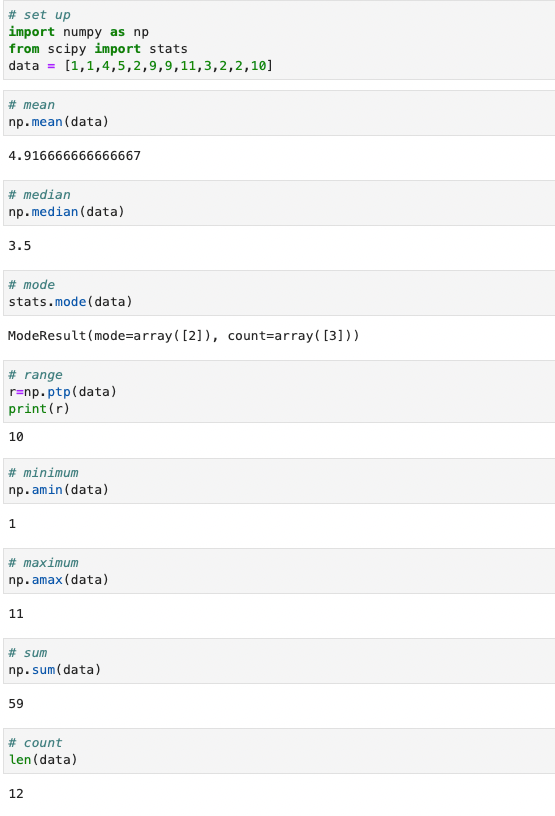
With my Data Analytics learnings continuing at a fair pace I need to be able to turn data into something nice (e.g., plot it onto charts). I could use Power BI or R , but as regular readers may know my preference for most tasks is Python. Python offers several libraries that are great for data analytics and thanks to Jupyter there is also a cool web interface to use.
I decided to look at utilise a Raspberry Pi 4 (4GB) and Docker so that I can carry out data visualisation.
Note: Using a cluster of Raspberry Pis instead of a single Pi? Then a Kubernetes cluster on Raspberry Pi may be for you.
Prepping the Pi
My Raspberry Pi 4 is currently running Raspberry Pi OS Lite (64-bit), available from the Raspberry Pi website. Why Lite? I like the terminal interface and I generally don’t leave my Pi connected to a monitor, so the desktop option would be wasted on me.
Once a OS has been applied and the Pi has booted it’s best to update (incase anything has changed since the OS image was created) with the usual update / upgrade commands:
sudo apt-get update
sudo apt-get upgrade
Install Docker and Docker Compose
Docker allows for containers to be run, Docker Compose makes it easier to control how the containers are run. I recommend both as it makes carrying options / settings between containers (especially when destroying /recreating containers) easier.
curl -sSL https://get.docker.com | sh
sudo usermod -aG docker ${USER}
The curl command downloads and then pipes ( | ) a script to the shell (sh) which installs Docker. The usermod command adds the current user to the docker group, allowing for Docker commands without the need of using sudo. Docker can then be enabled (to start at every boot) using the command:
sudo systemctl enable docker
After a reboot Docker should be ready to go, but if wanting Docker Compose I would hold off rebooting and instead run the following commands:
sudo apt-get install python3
sudo apt-get install python3-pip
sudo pip3 install docker-compose
and then reboot. This will install (if they are missing) the bits needed for Docker Compose.
Docker Compose File and Command
Docker Compose checks the current location for a docker-compose.yml file and then uses that file’s contents to guide Docker into running a container. Using Docker Compose to bring up or take down a container is as simple as two commands:
docker-compose up -d
docker-compose down
As long as these commands are run from the same location as the docker-compose.yml file they should work. My recommendation is storing each docker-compose.yml in its own directory (I generally create one for each project I’m working on).
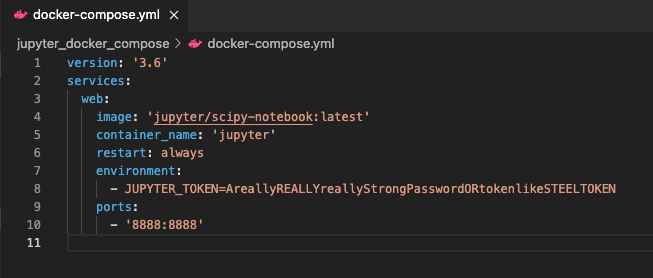
Jupyter provide a Docker container that contains their scipy-notebook (includes the various Scientific Python modules needed for data analysis) using the image label “jupyter/scipy-notebook:latest” with the “latest” tag pulling the latest version (previous versions are available using version numbering). I can use this information in my docker-compose.yml file to help use the correct container image and then through in some extra details.
I want to name the container “jupyter” to make it easier to find when running list commands in Docker. I want the container to restart if it crashes, or if the Docker service restarts. As Docker starts at boot this should mean that the Jupyter container starts just after boot as well.
Jupyter requires a token on initial start. I could use a Docker command to query the command out of the container, or (my preference) the token can be set in the docker-compose.yml file which will then set it in Jupyter. As always, if your storing any of this in a repository I recommend removing out passwords / sensitive information (steel token is not my token value).
As the notebook runs on port 8888, and that port is currently free on my Pi I am going to forward traffic to 8888 within the container from 8888 on my Pi.
The Jupyter notebook can then be brought up using the above docker-compose command and be accessed via a web browser pointed at the IP address of the Pi followed by :8888 . For example, if your running it on a Pi at 192.168.1.5 then the web browser will need to open: http://192.168.1.5:8888


You must be logged in to post a comment.